Car Mat
(If the pictures don't work well for you, just leave a comment and I could get them to you.)
Car Mat
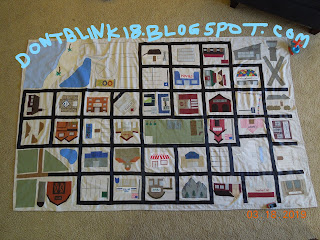
I finally finished my car mat! I've been working on it for almost five years! I wanted to share it in case anyone out there is looking for ideas for a car mat.
So this is possibly the most time and labor intensive car mat ever, but I LOVE it and am really proud of how it turned out. I had so much fun making it and watching our kids play on it (unfinished) and beg me to finish it. It would have been cool to have finished it a year or two ago, but at the same time I'm glad it took so long because my kids came up with some of the places to be on there.
I started by buying a painter's drop mat, taking the measurements of it and then drawing (on paper) in foot-ish increments what I wanted the roads to look like and a "floor plan" of what would go where. I looked online at quite a few other car mats (both home and factory made) to make sure I got all the shops and features I liked. I bought black ribbon (with coupons) to make the roads and got that sewn on. I had originally planned on having curves in the roads, but had to stick with straight for ease. I'm so glad I thought of putting the ribbon down because it has really held up well.
Then I googled pictures of the individual places and drew them out of how I was going to actually make them. And then went to my fabric drawer and found the fabrics I was going to use. Years ago when I worked at a interior design place, I started keeping samples of fabrics that were discontinued that I liked (that I hoped to use to make this someday). I used those as well as fabrics from old clothes (like the schoolhouse was a sweater that I needed to get rid of). I bought the green for the farm fields and park and a bit of gray for the windows, but that was it! And thread. So crazy enough, it was pretty cheap.
Here are some close-ups:The houses on it are places we've lived or where the grandparents live.
I had fun stylizing some of the buildings after ones that have meaning to us. The City Hall looks like the Carthage City Hall where we got our marriage license.
Jiffy Lube is Jack's current fave!
I was self-taught on this and had some trial and error figuring out how to best do it. At the beginning, everything was 100% appliqued on but I realized how hard it was. So I bought some markers and began using them and am sooooo glad I did! (Even though they're permanent, they have bled in a few places which is a bummer, but oh well.) Most of them ended up as a mix of applique and marker.
At beginning I would applique the entire thing to the mat. Thankfully I realized I could applique nearly the whole thing to itself and then just do the border to the mat. That was a HUGE time and sanity saver! But just for fun, here is what the back looks like. You can tell which ones I did at the beginning because of all the detailed applique on the back.
I do regret that it isn't washable. If I were to do it again, I would probably look into using printable iron-ons or something. But I love it and hope my family will love it for years to come.


Comments
Post a Comment